T-34 by Luciano Rodriguez Revell 1/72

LUさんの最新作です!スモールスケールでこの細かさ。さすがLUさん。とても参考になります! 
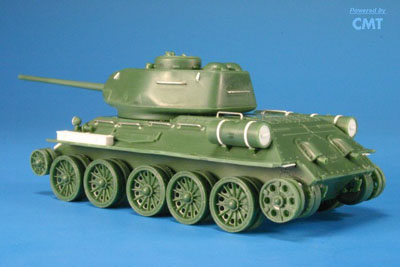
LUさんと自分の共通の目標は可能であればなるべくエッチングに頼らない模型作り、そして出来る限り自分の見つけた技術をシェアするという事です。多めの画像と説明で初心者の人にも分かり易い物が出来れば幸いです。

翻訳に関してはなるべくLUさんの言葉を拾っていますが、なにぶん本人も英語が母国語ではないためある程度の編集が必要な場合が生じています。よってそのような場合は要約してありますがご了承ください。

The pictures and the English captions are all provided by Luciano Rodriguez. (thank you so much LU!)

It is Revell 1/72nd scale T-34 85. It was done almost from the box.

I only added few small parts and replace holders with copper wire and remake tool boxes with plastic sheet because it was faster and easier.

組み立て:

ストレート組みに近い状態ですが手すりを銅線で、またツールボックス等をプラ板で製作しています。

塗装:
I apply the base color. In this time I use acrylic paints for airbrush from Vallejo Colors. I always make my own choice and I prefer to achieve a natural look instead an accurate look. So I mixed two green to make the base color. Also in this initial stage, I also painted undersurfaces in dusty color adding earth to the previous mix. It is not necessary to wait until you finished your paintwork to start the weathering in your models. It is very important to get a gloss base color, so I airbrushed a coat of a strong (resistant) acrylic gloss varnish.

基本色の塗装:
フレホ(なんと読むのでしょうね本当のところ?)のアクリルを使用。色の選択の基準としてLUさんは考証的な正確さよりもいかにスケールモデルとして自然に見えるかに重きを置いています。

今回の場合2種類のグリーンを混ぜて基本色としています。またこの基本色による塗装の前にアンダーコートとしてDusty カラーを使用しています。(dusty colourとはグリーンの基本色にブラウンを混ぜたもので車体下部を中心に使用しているそうです。)

アクリルであるため塗料の完全乾燥にはあまり気を使っていません。

ここで大切な事は塗装面を”つやあり”に仕上げておく事です。(要するに塗装面を平らのつるつる状態にしておくと言う事です。)

基本と塗装了後、完全に表面を艶あり仕上げにするためアクリル系のクリアをしっかりオバースプレイします。(これにより基本塗装の上にクリアの膜が出来上がり、望みの艶あり仕上げが得られるわけです。)


デーカル:


As I am making a tank almost from the box, I also use the markings included in this kit. When I use decals, I always cut the transparent film as much as I can with a sharp hobby knife.

作例はほぼストレート組みですが、マーキングもその例外ではなくキットのものをそのまま使用しています。

デーカルを使用する際には余白部分をホビーナイフを使用して可能な限り切り詰めています。

The best is to have a gloss and clean surface before decaling. This is the first reason why I wanted a glossy base color. Besides, I always use the help of especific products for decaling. In this way you can get the best fitting results. Liquids for decals make your decals fit perfectly to surface. The only trick is to use them carefully and wacht out how the decal dries slowly to avoid bubbles. Little by little the decal will follow the surface shapes and relieves.

デーカルを貼り付ける前に装着面が艶ありで仕上がっていること、また埃などないクリーンな面であることが大切です。ベストな仕上がりを得るためには使用するデーカールソフトナーも特定のものを選んでいます。(マイクロスケール社製の製品のようですね。)

デカールの乾燥具合をよく注意して観察する事がかぎでしょう。気泡が出来ないようにデカールがゆっくり乾燥していく事が重要です。 少しづつデカールは表面の形に沿っていきます。

汚し:

Once finished the base color, I make a wash with dark mix to enchance every detail in the model. For this I used enammel paints very diluted in thinner. It is very important to use acrylic colors for the base coat, because acrylic paint is the only one resistant to thinner. If your base color is gloss, then the wash will run smoothly across your model. The paint will only remains around the details easily. Notice how the color is still very yellow greenish and the glossy finish make it looks like a toy.

基本塗装とマーキング終了後、各部のディーテールを引き出すため暗いエナメル塗料でワッシングを行います。この際ベースの塗料がエナメル系溶剤に耐えるアクリルである事が必要です。またアクリルの基本塗装が艶ありで仕上がっている場合、エナメル塗料のワッシュは大変スムーズに車両全体にいきわたってくれます。エナメル塗料は簡単に模型の細部の周辺のみに溜まります。

模型の塗装はこの段階でまだかなり黄色がかった緑でその艶あり仕上げの塗装からまるでおもちゃのように見えます。

Following I painted the chipped paint. For this I use a dark mix of acrylic colors and a fine brush. I painted scratches and dark dots along all the hull and turret. I tried to achieve the effect of heavily battered weathering because my tank is one street fighter in the fall of Berlin, so it was hit many times by small arms fire and debris. The most important is to draw a natural pattern for scratches and chiped paint effect. Also it is very important for a reallistic look to make them very small to scale.

チッピングを施します。これには暗いアクリルの塗料と極細筆を使用します。車体、砲塔に引っかき傷と暗色のドットを付けていきます。

この車体はベルリンの市街戦を想定して作っています。数多くの小銃からの命中弾を受けまた様々な破片によってかなりの損傷等を被っているはずですのでヘビーなチッピング等のウエザリングを行います。

この際如何に自然な感じでチッピングやひっかきパターンを車体に付けれるかが重要です。そしてスケール的にリアルにするためにもそれらを如何に小さく施せるかも大切です。

When I finished the negative chipped paint in dark color, I also painted some mapping with a ligh green achieveing a positive effect, I mean giving relieve against the dark color. Notice how the base color is now much more disrupted and looks quite different in only three steps.

暗色で行うだけでなくその他に明色を使ってのチッピングも行います。今回はその色にライトグリーンを使用しています。(暗色だけでは単調になるために自分の場合もそうですがLUさんも2色使用しています。)

ご覧のように僅か3つのステップで始め均一であった基本色がこれだけ変化しました。(直訳ではないですが意味あいはこうです。)


埃の表現:

Once finished the scratches, chipped paint and other minor damage effects, we have to add heavy dust and weathering to our tank. The weathering will enhance many details and will create a new 3D effect different to what it was until then, because also light colors will increase the deep of some details in some ways. For weathering one can use almost anything if one knows how. After being weathering tanks with dry methods lately (chalk powder and pigments) I wanted to try somehting different this time.

一通りのはげチョロを含むダメージ表現が出来れば今度は埃と汚し塗装を行います。
この汚し塗装は各部のデイテールを浮き上がらせる為、この行程以前に見られた立体感とはまた違った効果が得られます。明るい色を使用することにより深みを増すことが出来ます。

さて汚しの方法ですが人により様々な方法があるように思います。自分の場合はここ最近ドライメソッド(パステル中心の汚し方です。)を使用していますので今回は少し違う方法を試みたいと思いました。

Using very diluted (90% thinner 10% paint) enamels, I give some light coats allowing the paint to accumulate in some areas slowly, mainly around some reliefs and in horizontal surfaces. If you let to dry the previous coat, you can add more and different to your taste. Slowly your tank will fade away with a ghost appearance. Do not panic.
かなり薄めたエナメル塗料を(溶剤と塗料は9対1の比率です)使用して薄めに幕を作ります。この際ゆっくりと塗料が各部、特に凸部や平面の周辺に溜まるようにします。
塗料が乾くにしたがって戦車表面全体が(つや消しエナメル塗料の効果でお化けのように!)白っぽく成ってきますが!しかしパニくらないで頂きたい!

The most imporant thing using this method, is to control the drying time. If one cheks how it dryes, one can correct the accumulations removing the excess when necessary with a cotton stick and clean thinner. If you removed too much, then re-coat again. It is a very easy and controlable method for painting dust. I often like to use enamels for this effects, because they dry fast, can be easily corrected when necessary and gives a matt finish, something very usefful to enhance the contrast between the clean -glossy- areas and the dusty -matt- areas.

この方法で一番重要な点は塗料の乾燥時間です。どのように塗料が乾くかよくチェックすることにより各部に溜まり過ぎた塗料を溶剤をしみこませた綿棒で取り去る事が出来ます。除去し過ぎた場合はまたエナメル塗料を塗りなおせばいいのです。

個人的にエナメルを使うこの方法大変気に入っています。エナメルハ直ぐに乾きますし、失敗しチェも直ぐにまたやり直せます。この様にエナメル塗料でつや消し効果を容易に再現できるため戦車の各部に実際ある汚れ無しで艶ありの部分、そして埃っぽく、艶の無い部分を表現するのにするのに適していると思います。

その他のステイン及び錆等:

Once finished the heavy dust, weathering continues with other stains in different colors for rust, smoke or fuel stains. Again I use enamels over the pevious coat of light dust. This will break the dust coat in sections and will enhance contrast between different parts of the tank.

エナメルによる埃りの表現が終わりましたが汚しはまだ続きます。
オイルや燃料、そして煙などによるステインと複数の色を使用する錆等の再現です。今回もまたエナメルを使用しますが使用する色が違うため、埃の表現で使用した”単”明”色のエナメルのコーテイングに変化をつけてくれます。これにより戦車の各パーツのコントラストが強調されます。


転輪の塗装:

I painted the wheels apart. I first airbrushed the base color when I painted the hull. Following I painted the road bands os the wheels. The tractor wheels, have no rubber band, so I painted road band with light steel color. As far as our tank will be in urban running condition, no mud, only dust, the road bands will be the cleanest areas of the wheels due to natural movement.

転輪は塗装は車体の基本色塗装を行った際に同時に済ませています。キャタピラに触れる部分にライトスチールカラー(フラットアルミと思ってよいと思います。)を塗装します。

今回のT−34はストリートで戦闘中の設定ですので泥をつけません。瓦礫等から出ている埃が主な汚れ元になりますので.....。転輪のこの部分はキャタピラとの接触により一番クリーンな部分になります。


In the road wheels, I painted the black rubber band with panzer gray color. I did not use black color. these bands must look lighter than the road band, plus ir enhance some interesting 3D effect in the sides of the wheel.

ゴム製の部分にはブラックではなくジャーマングレイ使用します。この際キャタピラのカラーと同じ色調の物を使うのではなく。より明るめの塗料を使います。これにより転輪がより立体的に見えます。


Dusting the wheels. For weathering the wheels, I add a very light coat of Tamiya buff very diluted in water flooding the area and let it dry slowly. It is the best way to get the radial dust effect. The fact is that when the superficial tension of water brokes up, then, the water remained nest to reliefs or recesed lines. In this way it formed dense clouds of dust color accumulated in a natural way.

埃:

かなり薄めたタミヤのバフを埃の再現使用します。この薄い塗料を溢れさすことにより、自然な感じの埃の堆積具合を再現する事が出来ます。


For breaking the previous uniform (regular) dust and to make the oil stains in the center of the wheels, I applied again very diluted enamel paints. Once again, using different mediums (enamels over acrilics), new paint does not affect to previous colors and can be cleaned or corrected when necessary.

オイルによる汚れ(ステイン):

お隣で再現した単調な埃の汚れに変化をつけるためオイルの汚れを転輪の中心に再現します。ここではかなり薄めたエナメル塗料を使用します。違った素材を使用することによりやり直しが必要であれば行えます。よxtぐて塗りすぎた塗料は溶剤を含ませた綿棒等でふき取っています。

For finishing the road wheels I darkened the road band with a wash or acrylic black. In this way, the road band became darker than the rubber band of the wheel due to rolling movemment.

転輪のゴム部分塗装:

アクリルのブラックを使用してワッシングを行います。キャタピラに接している部分がその他のゴムの部分よりも黒くなるように意識して塗装をしています。転輪のゴム部分の色の違いをこれにより再現。キャタピラに直接触れる部分はより濃い色、そうでない側面の部分には薄めの塗料が乗るようにしています。

(LUさんかなりこだわりを持っているようですね。このサイズでこの塗り分け方です。1/35でも、そのようにされている人をがいらっしゃるのかどうか.....。是非1/35でも試してみたい物です。)

Painting the outer side of the tracks before assembly in three steps. 1) I painted the base color with a dark mix of black and burnt umber of your favourite paint, no matter acrylic or enamel. 2) I added heavy rust and dust with some washes of tamiya enamels buff and hull red. 3) I got a final metallic finish wubbing with a ordinary black pencil.

キャタピラの塗装 外側 :

塗装はキャタピラを本体に取り付ける前に行います!

1)ブラックとお好みのバーントアンバーのミックスで先ず塗装します。この際塗料はエ  ナメルでもアクリルでもかまいません。

2)タミヤのエナメルのバフおよびハルレッドを使用して再びワッシュを行いヘビーな錆   や埃を再現します。

3)最終的に鉛筆を擦り付けて完成です。

Painting the inner side of the tracks. 1) I applyed the case color and 2) the same heavy weathering as inner side. 3) I masked the edges of the tracks with masking tape, and I drybrushed black for marking the road band of the road wheels. Once finished I painted the teeth of the tack links with natural steel color.


キャタピラの塗装 内側 :

1) 外側の塗装の際に使用した塗料を使用します。

2) 汚しも同様に行います。

3) 転輪が直接キャタピラに接触している部分とそうでない部分は当然色が異なってき ます。キャタピラの中心部分〔転輪が触れる部分〕が残るように両端をマスキングします。そしてブラックでドライブラシ行います。これで中心部分の色が濃いものになります。仕上げにキャタピラの歯の部分に銀色を乗せておきます。

(実にいい感じに仕上がっていますね!)

17) Final touch. Once I finished assembly of the tracks, I enhanced the angled edges and shapes of hull and turret with a graphite pencil, it takes its time, but it will add the last sharp contrast between clean and dusty areas, plus a nice nice metallic shine.


仕上げ :

こすれ等により金属の地肌が露出したと思われる車体の各エッジ部分に鉛筆をこすり付けていきます。時間の掛かる作業ですがこれにより車体の汚れていない部分そして誇りまみれの部分に程よいコントラストをそのメタリックな光沢により再現できます!

それにしてもこの小スケールでこの完成度.....。凄いですね。どー見ても金属の塊です。
LUさんありがとうございました。 しの


Thank you for your great work LU aniki !